I still remember my first layer cake. Two sponges, a bowl of buttercream, and a kitchen that looked like a flour bomb went off. The frosting grabbed every loose crumb and turned the whole thing into a speckled disaster. So here's the thing: learning how to frost a layer cake isn't about fancy piping skills. It's about one technique—the crumb coat—plus a few temperature rules most tutorials skip.
This guide walks you through the exact steps I use now, including the spots where beginners quietly go wrong. No fluff, just the stuff that actually affects how your cake looks and tastes.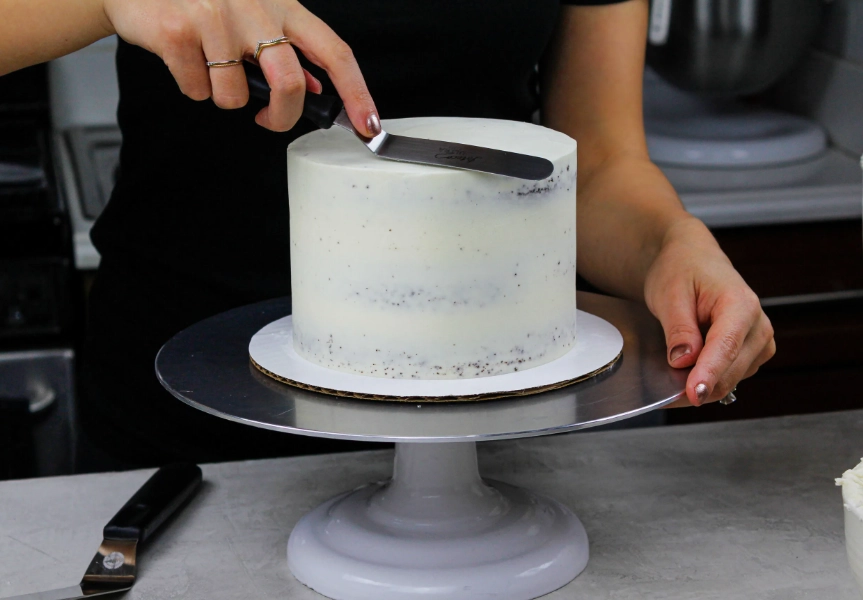
Jump To What You Need
1. Prep: Get Your Layers Level Before Anything Else
Your cake layers need to be completely cool. I mean room temperature or cooler. Warm cake plus frosting equals a slip-and-slide situation.
Here's what I do: bake the layers a day ahead, wrap them tight in plastic wrap, and chill them in the fridge. Cold cake is firmer and catches fewer crumbs.
If the domes are tall, slice them flat with a serrated knife. A level top means your tower won't lean. Plus, those scraps make a great snack.
2. The Crumb Coat: Why It's Non-Negotiable
This is the step most beginners skip. And it's the exact reason their final coat looks rough.
The crumb coat is a thin layer of frosting that acts like a primer. It grabs every stray crumb, seals the cake, and gives the second coat something smooth to grip. Without it, you're just chasing crumbs around the surface.
Here's how to do it right:
- Spread thin: Use about a cup of frosting for an 8-inch cake. It should be almost see-through in places.
- Work from the center out: Let the excess push toward the edges naturally.
- Scrape smooth with a bench scraper: Hold it at a 45-degree angle and spin the turntable. Don't obsess—this layer gets covered anyway.
- Chill for 20 to 30 minutes: Until the frosting feels firm to a light touch.
3. The Final Frosting Pass
Now the fun part. Pile about two cups of frosting on top of the chilled crumb-coated cake. Don't be shy. Pushing frosting to the edges is easier when you start with enough.
Spread it over the top first, then push down the sides. Spin the turntable slowly while you hold the scraper steady. The goal is smooth, even coverage.
My personal trick: run the scraper under hot water for five seconds, dry it, then do a final pass. The warmed metal glides through buttercream like butter.
Texture matters more than most people think. If the frosting feels stiff or looks dull, it's too cold. Add a teaspoon of milk or cream and stir it back to life.
4. How Do You Get Those Sharp, Clean Edges?
The top edge of a cake is where most home bakers lose confidence. Here's the fix: after the final frost, run your offset spatula under hot water, wipe it dry, and drag it across the top edge in one smooth motion. Do this for each side. It sharpens the line almost instantly.
For the bottom edge, slide a thin cake board or parchment strip under the cake before you start. Frost right to the board. When you're done, pull the strip away and you're left with a clean bottom border.
| Edge Issue | Quick Fix | Tool |
|---|---|---|
| Rough top edge | Warm spatula drag, one motion per side | Offset spatula |
| Frosting pooling at base | Parchment strips under cake | Parchment paper |
| Lopsided sides | Rotate cake and scrape in short bursts | Bench scraper |
5. Fixing Common Frosting Mistakes
Buttercream turning soupy? Your kitchen is too warm. Move the bowl to a cooler spot or pop it in the fridge for ten minutes, then whip again. Don't add more powdered sugar unless you want it sweet enough to hurt your teeth.
Frosting pulling up cake chunks? Your crumb coat wasn't firm enough, or you started spreading before it chilled. Scrape back what you can, re-chill, and try again.
Air bubbles showing up on the surface? This is normal. After the final coat, let the cake sit for ten minutes, then do a slow, steady pass with the heated scraper. Most bubbles vanish.
6. Questions I Get Asked All the Time
My cake slides sideways after I frost it. What went wrong?
A sliding cake usually means the layers weren't level before stacking, or the frosting between layers is too warm. I use a dab of frosting on the cake board to anchor the first layer. And I chill the stacked cake for fifteen minutes between filling and frosting. This sets the layers so they don't shift.
Can I use a store-bought tub of frosting for a layer cake?
You can, but you'll fight it. Tub frosting is soft and holds air bubbles. I doctor mine by whipping it with a tablespoon of softened butter and a pinch of salt. It firms up and loses that canned flavor. Just don't over-whip, or it thins out again.
How far ahead can I frost a cake without ruining it?
A frosted cake keeps well in the fridge for two days. Wrap it loosely with plastic wrap once the frosting is set. Take it out an hour before serving so the texture softens. If someone tells you frosting stays perfect for a week, they're either lying or using a lot of preservatives.
Why does my frosting look grainy?
Powdered sugar that's old or clumped causes graininess. Sift it before you add it. Also, butter and sugar need to be truly room temperature. If you hear a gritty sound when you rub a bit of frosting between your fingers, the sugar hasn't dissolved. Let the frosting sit for ten minutes and whip it again.
Frosting a layer cake isn't a talent you're born with. It's a repeatable process. Level the layers, chill them, crumb coat, chill again, then finish with a warmed scraper. Keep your ingredients at room temp and your frosting cool. That's the whole game.

Leave a Comment